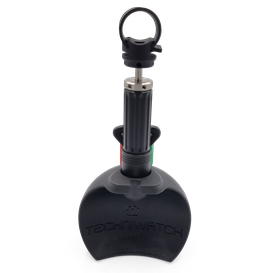
VOLUMETRIC DOSING DEVICE
Precise - Transportable - Ergonomic
MICRODOSE A fluid WITH JUST A CLICK
This
dosing device was designed to meet the glue metering requirements for assembling watch components. It gives watchmakers greater freedom in their movements, thanks to a fully mechanical pen-type
design. The holding ring has an ergonomic shape to best accommodate a variety of finger sizes while still being handy, even for long jobs.
The dosing device enables them to keep one hand free to hold a component, while continuing to work.
The dosing device's repeatability guarantees perfect control of the volume applied, and a stabilised process. It was designed to save time, the product need only be loaded into the chamber built into the device. With a single refill, you can apply up to 1000 x 0.25 µl doses 0/+20% into a S.09 tapped hole. One "click" on the ball click built into the system equates to one dose applied.
The dispenser’s repeatability ensures precise control of the applied volume and contributes to process stabilization. It has been designed to save time — simply load the product into the integrated chamber of the device. With a single refill, it is possible to perform up to:
· 1200 doses of 0.25 µl (0/+20%)
· 1200 doses of 0.3 µl (0/+20%)
· 1200 doses of 0.4 µl (0/+20%)
· 1200 doses of 0.5 µl (0/+20%)
One "click" corresponds to the delivery of a single dose.
Besides glue, the volumetric dosing device can be used for applying oil, grease or other fluids. All parts of this tool are made from synthetic materials, so that the products do not get stuck in the chamber. Since this dosing device is volumetric, it delivers the same quantity of fluid regardless of viscosity. You can create a vacuum in the chamber by withdrawing the piston so that the needle is not blocked when the device is at rest.
The device comes in both right- and left-handed versions. We also offer custom nozzles and volumetric doses.

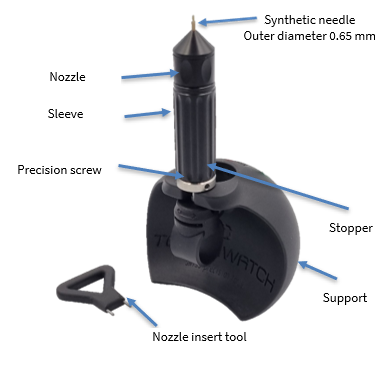
Technical specifications:
· 0.25 µl dose (approximately 1000)
· Ø0.60 synthetic needles (for S.09)
· Good repeatability
· Ergonomic and adjustable holding ring
· Deposit indicated with a "click"
APPLICATIONS:
- MICRO-DOSING FLUIDS
Avantages :
è Precise and repeatable dosage
è 100% transportable energy-free tool
è Quick refill, and hands-free
è Easily replaceable clip-in needle
è Ergonomic and adjustable holding ring
è Fluid drying prevention chamber
è Easily removable and replaceable chamber and piston for cleaning
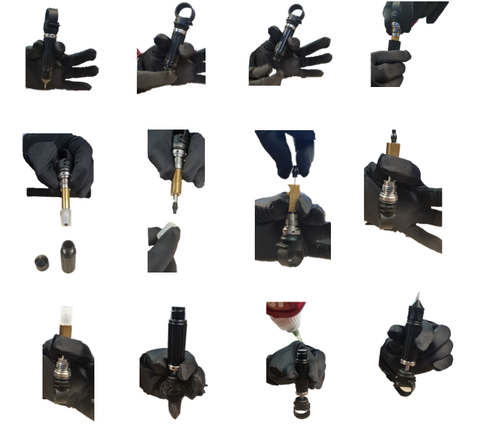
Usage Instructions :
Seal the dispenser
Turn back at least 2 full turns to create a vacuum
Compatible adhesives: LOCTITE 222, 243, 601, and 6300
For any other adhesive use, please seek prior guidance
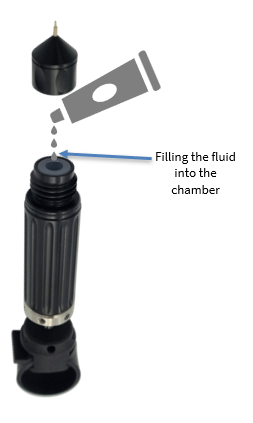
Advice for filling the reservoir:
To fill the reservoir, a press system built into the device's holder enables it to be positioned "nozzle up", in order to facilitate fluid transfer from its original container to the dosing device. To do so, you need to unscrew the precision screw by 10 mm, tighten the dosing device on the holder, unscrew the nozzle and then fill it. Take care to avoid fluid overflowing from the chamber.
Tips for Replacing Seals, the Needle, and the Nozzle Insert:
Insert the tool into the nozzle insert and unscrew the entire assembly
To replace the needle, pull it out from the nozzle
To replace the seals, use a flat-head screwdriver
Once all components have been replaced, reassemble everything using the tool and tighten the assembly securely

Advice for cleaning:
· Cleaning in production (the dispenser must be emptied at the end of the day)
To clean the fluids present on the parts of the chamber inside the dosing device:
1. Unscrew the precision screw about 10 turns to create a vacuum in the needle.
2. To clean the needle thoroughly, immerse it in isopropyl alcohol. Make sure to blow out the liquid using an air blower (repeat blowing from both sides).
3. Unscrew and remove the nozzle.
4. Unscrew the stopper and remove the internal mechanism, including the chamber.
5. Separate the chamber from the piston and clean it.
6. Wipe off any fluid on and around the piston using a dry absorbent paper.
7. Clean the inside of the nozzle in the same way.
8. You may clean the chamber and nozzle with isopropyl alcohol. Be sure to wipe off the alcohol with dry absorbent paper before it dries to remove any residues. Use an air blower on small orifices to ensure they are not blocked.
9. For priming, unscrew the mechanism until the piston reaches the start of the chamber (the thread of the precision screw must not come out of the bronze sleeve).
10. Insert the chamber into the piston.
11. Screw the stopper back on to secure the mechanism.
12. Screw the nozzle back on or begin a new filling procedure.
· Fully cleaning the dosing device (if it is going to be out for use for several days)
1. Carry out the Cleaning in production procedure (see above) as far as step number 6.
2. Fully unscrew the stop.
3. Carefully pull out the system shaft from the inside of the dosing device's handle.
4. Dry clean the assembly, taking care not to touch the screw threads, as this could impair the operation of the precision screw.
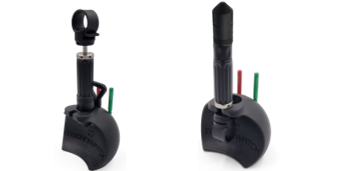
Putting away in production:
The holder was designed to house the volumetric dosing device's cap on the rear. Hence you can put the pen in its cap between operations and easily retrieve it.
Once production is complete, you can unscrew the cap from the holder and refit it on the dosing device.
Finally, the tool can be hung head up once the work is finished.
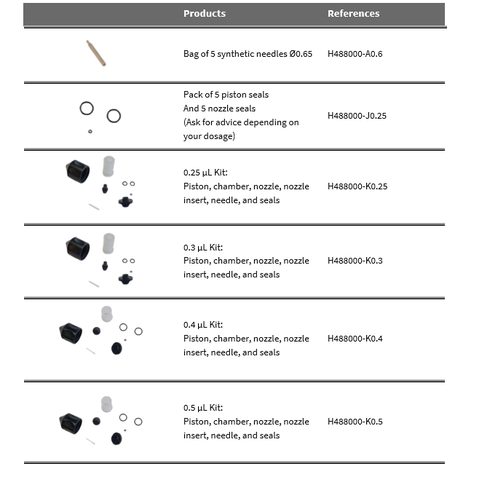
ACCESSORIES: